| Data Destroyer |
|---|
| Purging multiple files |
Data Destroyer provides two ways of purging multiple files:
Method 1: Select a folder then specify which files in that folder (and optionally in all subfolders) are to be purged.
Method 2: Select a folder then specify which subfolders in that folder (and non-optionally in all subfolders) are to be purged.
The first method allows you to restrict the purge operation to files of a particular type, for example, .xls files. It also gives you greater control over the purge operation (e.g., you can exclude read-only and system files, as explained in Refining and confirming the purge operation) and you can get a report of files purged. If you simply want to purge all files in selected folders (and their subfolders), and don't need a report, then it is simpler and quicker to use the second method (which is explained at Purging selected folders).
This section and the two following (Listing files and estimating purge time and Refining and confirming the purge operation) concern only the first method, not the second.
A. Specifying the folder containing the files to be purged
 To purge multiple files (in a single folder and optionally in all subfolders of that folder) you first specify the folder and then specify the files within that folder.
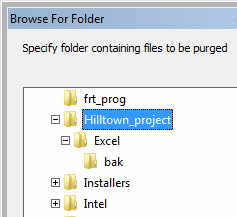
Click on the Specify folder button to specify the folder
(a.k.a. subdirectory) in which the files are located. Click on the '+' icons to open supfolders and locate the folder you want, click on it, then click on OK.
B. Subfolders?
Data Destroyer allows you to purge files also in all subfolders of the folder you specify. For example, suppose \Hilltown_project has exactly four subfolders, namely, docs, Excel, memos and reports. Suppose also that you have specified \Hilltown_project as the input folder and have specified that all files be purged (as explained below).
If you then click on Subfolders? (setting it to Yes) then Data Destroyer will be set up
to purge all files in \Hilltown_project plus all files in
\Hilltown_project\docs
\Hilltown_project\Excel
\Hilltown_project\memos and
\Hilltown_project\reports plus all files
in subfolders of these four subfolders (and so on).

This allows you to purge all files (or a subset of them) pertaining to a particular project, provided that all such files are in a particular folder or in one of its subfolders.
When purging files in subfolders make sure that no other program is accessing any subfolder, or file in a subfolder, otherwise Data Destroyer may given an error message when attempting to delete that file or subfolder.
C. Specifying the files (in the folder) to be purged
After the folder has been specified, click on Specify files to specify the files in that folder which are to be purged. There are several ways to specify the subset of files:

 If you want to purge all files (in a selected folder) with a particular file extension, e.g., .txt, then
click on the
If you want to purge all files (in a selected folder) with a particular file extension, e.g., .txt, then
click on the
Purge all files with a particular extension textbox and enter txt (or .txt).
| Next: Protected files | |
| Data Destroyer Main Page | Hermetic Systems Home Page |